Creative workflows
How to make a product video with AI
Make a short AI product video with a clear brief, a copyable prompt and a practical review. Watch a supplied SwipeForge example before planning your own.
 Kirill Zaikov6 min readUpdated
On this page
A short product-style video supplied as a SwipeForge generation.
The original model, prompt and settings were not recorded. The example prompt in this guide is a new brief to adapt, not the original prompt for this clip.
To make a product video with AI, choose one thing to show, start from a prompt or a clear product image, then check the full clip before publishing. A useful first brief describes one product, one action and a camera move you can judge.
The clip above is a supplied SwipeForge generation: a presenter holding a green smoothie. Its original prompt, model and settings are not recorded. The workflow below uses a new smoothie brief to show how to plan your own take. It is not a recipe that reproduces that exact clip.
Give the video one job
For the smoothie brief, the job is simple: make the drink and a small human reaction readable in a short vertical video. The viewer should notice the glass, its color and the moment the presenter reacts.
Choose a different job for a different product. A bottle might need a close-up of its shape and reflections. An earbud case might need one clear opening action. Keep a benefit such as taste, comfort or performance out of the brief unless you can support the claim.
Write the job in one sentence before opening a model. If the sentence needs several actions, split it into separate shots.
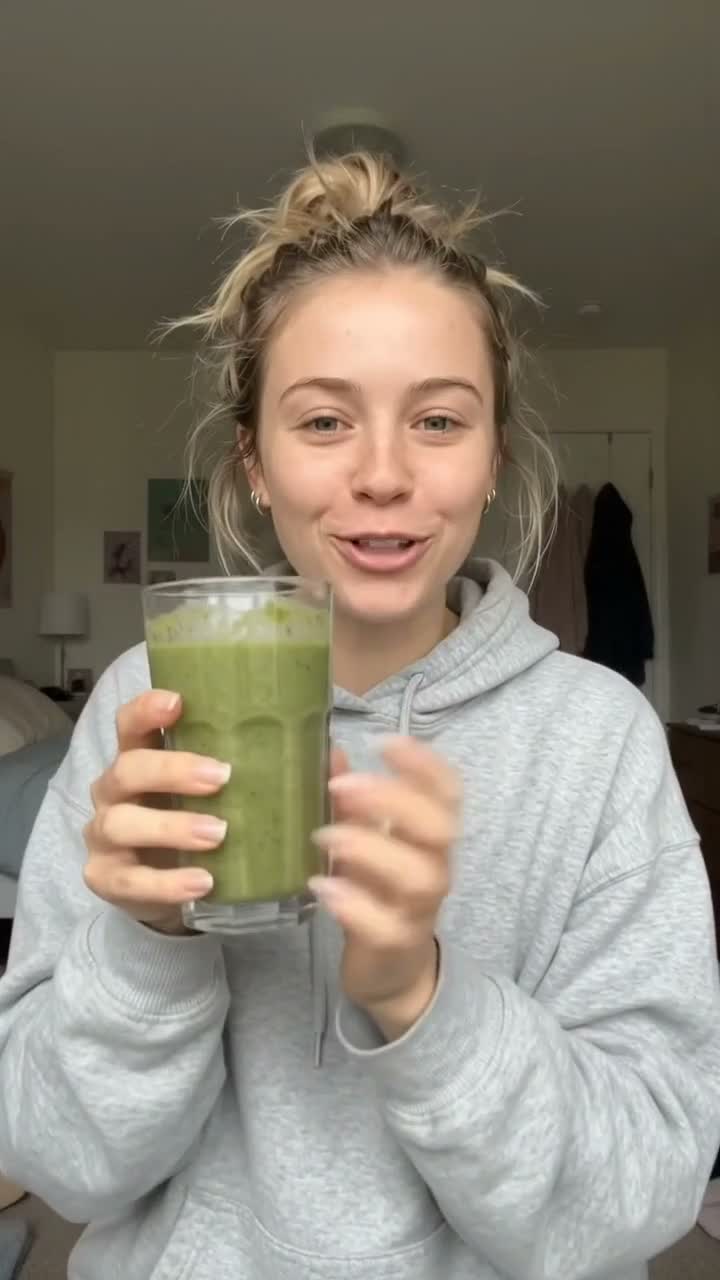
A frame from the owner-supplied SwipeForge example above. The guide prompt is illustrative.
Choose the format and starting image
Pick the destination and frame before generation. A vertical 9:16 composition is a useful starting point for a full-screen short video. Choose 16:9 when a wider product scene matters more.
| Starting point | Use it when | Prepare first |
|---|---|---|
| Text prompt | You want to explore a scene | Product, action, setting and camera instructions |
| Product image | The appearance of the actual item matters | A sharp image with its important details visible |
| Existing clip | You already have a shot to change | The source clip and one specific edit |
For an actual packaged product, use a reference that shows the real item. A text-only generation can invent packaging, labels and proportions. Review those details instead of assuming they will stay correct.
If you start with an image, check whether the selected model supports animating it as the first frame or using it as a reference for a new scene. The image-to-video guide explains the difference.
Set up the shot in SwipeForge
- Open Create with AI for a text-led concept. Choose video as the content type.
- Select an available video model. Use the model-choice guide if you need a starting point. A Product ad style can help with a product hero shot; read and adjust the supplied instructions to fit your idea.
- Set the frame and a short duration offered by the selected model. Review the generation cost and access shown in your account.
- Paste the prompt below and replace the drink, person or setting with the subject you actually need. Keep one visible action.
- Generate a take, then watch the entire result before changing anything.
The controls offered depend on the selected model and your account access. Creating a take does not publish it to your connected accounts.
Adapt this example prompt
This prompt is a new illustrative brief. It is not the original prompt for the supplied video.
A person in a plain gray hoodie holds one clear glass of green smoothie
at chest height in a softly lit kitchen.
They look at the drink, then give one brief natural reaction.
Keep the whole glass and both hands visible.
Static vertical shot, natural window light, a simple background.
Keep the glass shape and the drink color consistent.
No captions, logos or spoken product claims.
Keep instructions you can check. "Keep the whole glass visible" gives you a concrete review point. "Make an amazing ad" does not.
For a product-only version, remove the presenter and replace the action with one clear event, such as condensation moving down a glass. For more control over the wording, see how to write a text-to-video prompt.
Review the product, movement and framing
Watch once for the idea, then again for the details. Pause at the beginning, middle and end.
| Check | What to look for in the smoothie brief | What to try if it fails |
|---|---|---|
| Product identity | The same glass, liquid level and green color throughout | Ask for less motion or use a clearer reference |
| Hands and contact | Fingers hold the glass rather than passing through it | Simplify the grip and remove a second action |
| Framing | The drink remains visible and has room around it | Use a wider composition or a calmer camera |
| Timing | The reaction is easy to read without a long lead-in | Trim the pause and check the ending again |
| Sound and text | No invented claims, stray words or distracting sound | Revise the sound instruction or edit the finished take |
These are review criteria, not a promise that a model will satisfy them on the first attempt. Keep a take only when its details are good enough for the intended use.
Change one thing between takes
Save the prompt and settings before trying again. If the glass drifts out of frame, change the framing instruction rather than changing the subject, model and camera at once.
A useful second instruction might be:
Keep the glass below the presenter's face and fully inside the frame.
No camera movement. The presenter holds it still with one simple grip.
Compare both takes at the same moment. Keep the one that communicates the product more clearly, then make the next adjustment. Record the model, settings and chosen result so the next video starts from a known base.
Prepare the finished clip for publishing
Trim the version you want to keep. Add text or a caption that explains the idea without inventing a customer testimonial. Watch again after every edit.
Choose your connected accounts in the publishing review and check each destination's settings before you send or schedule the post. Making the video and publishing it are separate actions.
Posting one video to multiple platforms covers that review. If you are preparing a series, plan a week of short videos before making every take from scratch.
FAQ
Do I need a product image to start?
No. A text prompt can explore a concept. Use a clear reference image when the real product's shape, packaging or color must guide the result, then review the generated details.
Will the example prompt reproduce the video shown here?
No. The clip was supplied as a SwipeForge generation, but its original model, prompt and settings are not recorded. The prompt in this guide is a new example to adapt. Generated takes can vary even when you keep the same instructions.
Can I publish a take immediately after generating it?
Review it first. Check the product, motion, audio and destination settings, then choose whether to publish now or schedule it. Generation does not automatically send the clip to social accounts.
Try your own product brief.
Copy the example prompt, open the studio and adapt it to your product.
Create a product videoWritten by